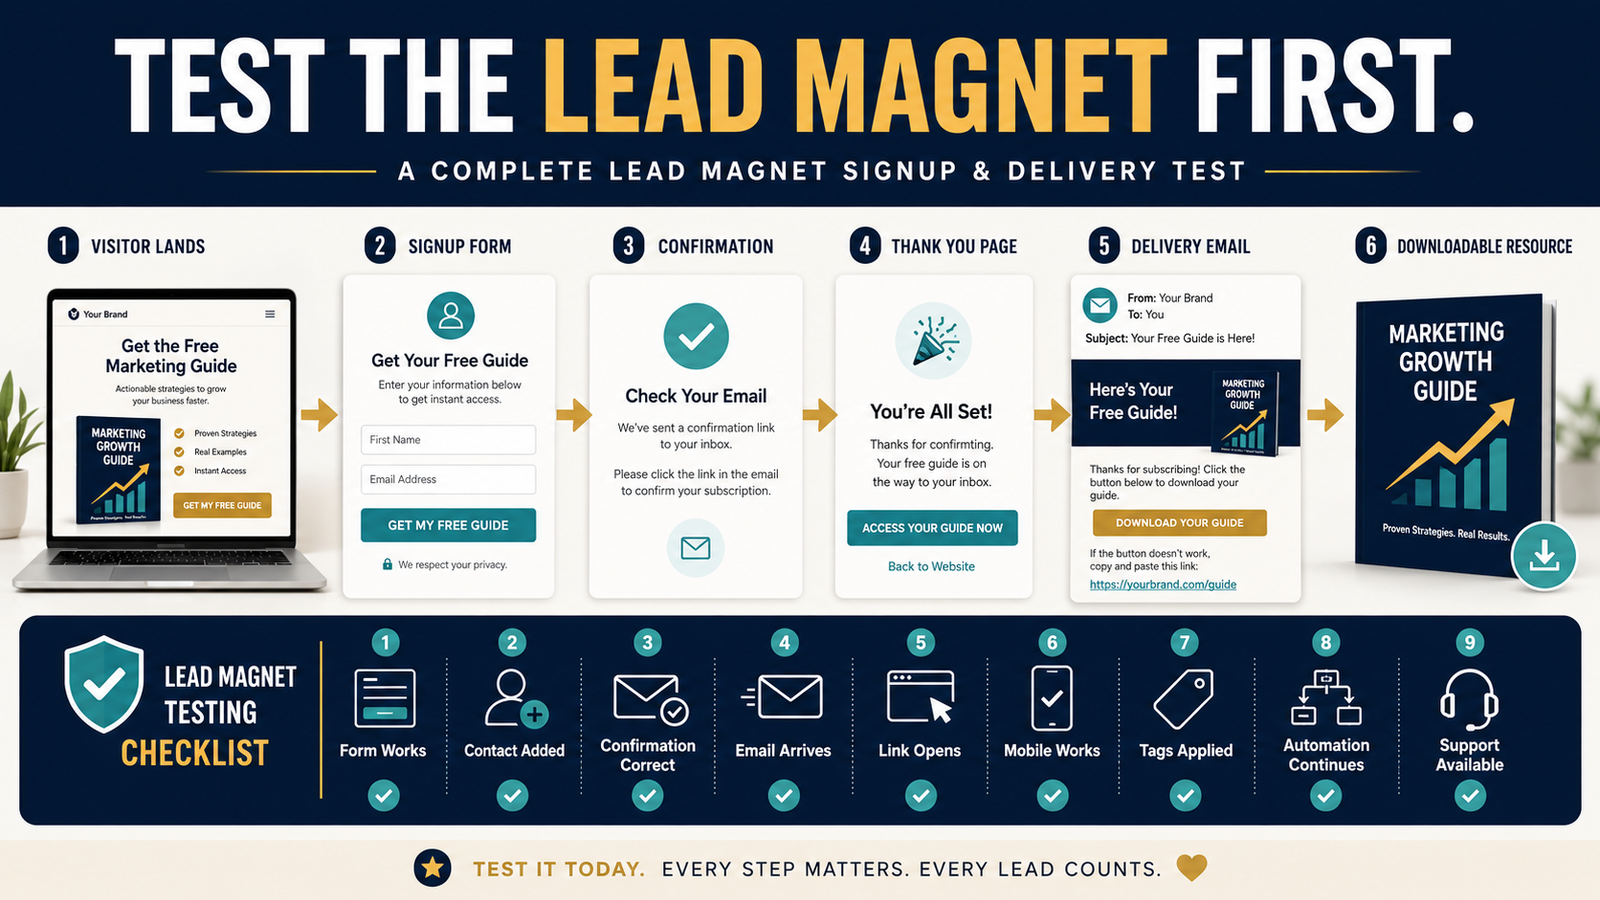
Creating a good lead magnet is only half the job.
A visitor still has to:
- Find the signup page.
- Understand the offer.
- Complete the form.
- Receive the expected confirmation.
- Reach the correct thank-you page.
- Receive the delivery email.
- Open the email.
- Click the correct link.
- Access the promised resource.
- Enter the correct follow-up sequence.
A problem anywhere in that chain can quietly waste traffic.
You may have a perfectly good checklist, guide, template, or ebook, but if the form fails or the delivery link is wrong, new subscribers experience a broken system.
That is why every lead magnet should have a simple end-to-end test process before you promote it heavily.
The workflow is:
Signup Page → Form → Subscriber Record → Confirmation → Thank-You Page → Delivery Email → Resource Access → Follow-Up
Test the entire chain as though you were a brand-new visitor.
Do Not Test Only the Download File
Many creators test the PDF.
They open it.
It works.
Then they assume the lead magnet system is ready.
But the file is only one component.
The actual subscriber experience begins before the download.
A broken button on the landing page can stop the process before the file matters.
A good test begins at the public page.
Step 1: Open the Signup Page as a Visitor
Do not start from inside your WordPress dashboard or email platform.
Open the public page.
Ideally, use:
- A private/incognito browser window.
- A mobile device.
- A browser where you are not already signed into your tools.
This gives you a closer approximation of what a new visitor sees.
Ask:
- Does the page load?
- Is the lead magnet clearly explained?
- Is the signup form visible?
- Does the button work?
- Are there unnecessary distractions?
- Is the expected next step obvious?
Fix obvious problems before testing the automation.
Step 2: Read the Promise Carefully
The lead magnet page makes a promise.
For example:
“Enter your email to receive the Affiliate Marketing Action Checklist.”
Now test whether the system delivers exactly that.
Watch for mismatches such as:
Landing page says:
“Free 25-page guide.”
Delivery email says:
“Download your checklist.”
Download opens:
“Workbook Version 1.”
Even when the file is technically correct, inconsistent naming can confuse a new subscriber.
Use one clear product name throughout the journey.
Step 3: Submit the Form With a Test Email Address
Use an address you control.
Do not repeatedly use the same subscriber record if your automation treats existing contacts differently from new contacts.
A fresh test address is often better for a true first-time test.
Complete the form exactly as a visitor would.
Check:
- Required fields.
- Error messages.
- Button behavior.
- Mobile usability.
- Whether submission completes.
- Whether anything unexpected appears.
If you request a first name, test what happens when the user enters one.
If the name is optional, test without it too.
Step 4: Confirm the Subscriber Was Added Correctly
After submitting, check the email platform.
Verify that the new subscriber entered:
- The correct list.
- The correct segment, if used.
- The correct tag, if used.
- The intended automation.
- The correct source tracking, when configured.
Do not assume this worked because the form displayed a success message.
The form and subscriber database are two different checkpoints.
Step 5: Test Your Confirmation Process
Depending on how your email system is configured, a subscriber may enter immediately or may first need to confirm the subscription.
Test the process you actually configured.
If confirmation is required:
- Does the confirmation email arrive?
- Is the sender recognizable?
- Is the instruction clear?
- Does the confirmation link work?
- What happens after confirmation?
- Does the subscriber then enter the intended sequence?
Do not write instructions describing one confirmation process while your system uses another.
Step 6: Check the Thank-You Page
The thank-you page should remove uncertainty.
A good page answers:
- Was my signup successful?
- Where will the lead magnet arrive?
- What should I do if I do not see the email?
- What should I do next?
My guide to creating a lead magnet thank-you page that actually helps new subscribers explains how to keep that page simple and useful.
During testing, confirm that the form sends visitors to the correct page.
Step 7: Wait for the Actual Delivery Email
Do not manually send yourself the lead magnet.
You are testing the automation.
Check:
- Did the correct email arrive?
- How long did it take?
- Is the sender name correct?
- Is the subject understandable?
- Does the email identify the requested resource?
- Is the main access link obvious?
- Does it provide support information?
Also check spam or promotions folders during testing, but do not assume you can guarantee inbox placement for every subscriber.
Your responsibility is to confirm that your system sends the message as configured.
Step 8: Click Every Important Link
A delivery email can look perfect and still contain the wrong URL.
Click:
- Main download link.
- Support link.
- Website link.
- Relevant footer links.
Check where each one goes.
Look for:
- 404 errors.
- Permission errors.
- Old files.
- Wrong products.
- Expired links.
- Access requests.
- Redirect loops.
This is especially important after replacing a file.
Step 9: Open the Lead Magnet From the Subscriber Side
Do not merely confirm that the file exists in your storage account.
Access it from the actual customer-facing link.
Verify:
- Correct file opens.
- Filename is understandable.
- PDF pages display.
- Links inside the PDF work.
- Images render.
- File size is reasonable.
- Mobile view is usable.
- The version is current.
If a lead magnet is delivered through a members area instead of a direct file, test the complete login and access process.
Step 10: Verify the Follow-Up Automation
The first email is not always the end.
Your subscriber may enter a sequence such as:
Email 1: Deliver resource.
Email 2: Help them use it.
Email 3: Teach something related.
Email 4: Introduce another useful resource.
During setup, verify:
- Subscriber entered the correct workflow.
- Email order is correct.
- Delay settings make sense.
- Old messages are not accidentally active.
- Test contacts do not enter unrelated sequences.
You do not need a complicated funnel.
You need the intended funnel to work.
Step 11: Test on Mobile
A large share of subscribers may encounter your system on a phone.
Test:
- Landing page.
- Form.
- Buttons.
- Confirmation page.
- Delivery email.
- Download.
- PDF or resource.
Look for:
- Tiny buttons.
- Cut-off text.
- Horizontal scrolling.
- Popups blocking forms.
- Download links too close together.
- Images that overwhelm the screen.
A lead magnet that technically works on desktop can still be frustrating on mobile.
Step 12: Test the Failure Experience
Ask what happens when something goes wrong.
Examples:
- Subscriber mistypes an email address.
- Email does not appear immediately.
- Download link does not work.
- File cannot be opened.
- Subscriber deletes the delivery email.
Give the user a recovery path.
At minimum, the thank-you page or delivery email should make support easy to find.
Step 13: Test the Journey Against the Original Promise
Now review the complete experience.
The simple digital product customer journey map provides a useful principle that also applies to free resources:
Do not stop measuring the journey at the click.
The subscriber’s first success happens when they actually receive and can use what you promised.
For a lead magnet, that may be:
Signup → Email Received → Checklist Opened → First Action Completed
That is a better experience goal than simply:
“Form submitted.”
Step 14: Use a Repeatable Test Checklist
Create a reusable record:
Landing Page
- Loads correctly.
- Offer accurate.
- Form visible.
- Button works.
Signup
- Form submits.
- Contact enters correct list.
- Tags correct.
- Automation triggered.
Confirmation
- Correct process occurs.
- Confirmation email works when required.
Thank-You Page
- Correct page.
- Clear delivery instructions.
- Support information visible.
Delivery Email
- Arrives.
- Subject correct.
- Resource name correct.
- Links work.
Lead Magnet
- Correct version.
- Opens correctly.
- Internal links work.
- Mobile readable.
Follow-Up
- Correct sequence.
- Correct order.
- Correct timing.
Record:
Tested On: September 4, 2026
Result: Pass / Needs Fix
Retest Required: Yes / No
Test Again After Important Changes
Re-test when you:
- Replace the lead magnet.
- Change the signup form.
- Move the landing page.
- Change the thank-you page.
- Change email platforms.
- Update the delivery email.
- Change a download URL.
- Modify the automation.
- Change domains.
A system that worked six months ago is not automatically working today.
Borrow the Same Discipline Used for Paid Products
You would not want a customer to pay for a product and discover that the delivery process is broken.
The same principle should apply to a free lead magnet.
My guide to testing a digital product purchase and delivery process before launch uses a similar end-to-end mindset for paid products.
The lead magnet version is simply a shorter journey.
Do Not Overcomplicate the Test
You do not need a twenty-page quality-assurance manual.
For a small business, the most important question is:
Can a brand-new person complete the full process without my help?
If yes, you have a functioning system.
If no, identify exactly where the journey breaks and fix that step.
Conclusion
A lead magnet is not complete when the PDF is finished.
It is complete when a new visitor can successfully move from the signup page to the promised resource.
Test the entire journey:
Page → Form → Subscriber Record → Confirmation → Thank-You Page → Delivery Email → Resource → Follow-Up
Use a fresh test email address, click the real links, check the subscriber record, test mobile, and repeat the process after important changes.
Before sending your next wave of traffic, complete one full signup yourself.
If you can move from visitor to subscriber to successful resource access without confusion, your lead magnet system is in much better shape to receive real people.