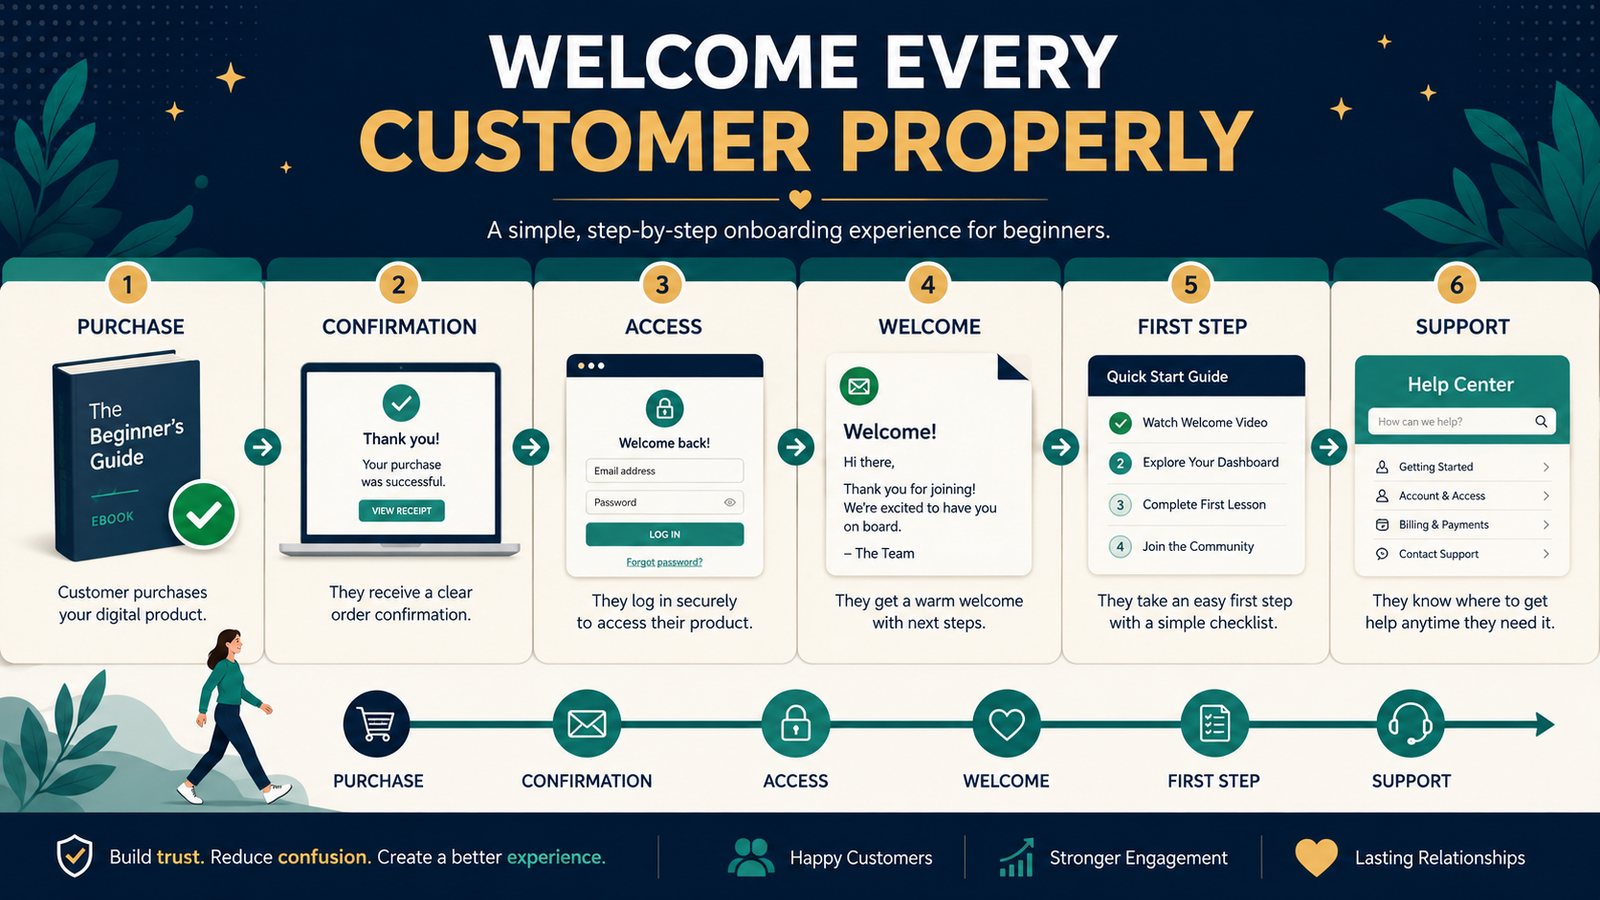
A digital product customer onboarding system begins the moment a buyer completes payment.
The customer should immediately understand:
- Whether the payment succeeded
- What was purchased
- Where to find the product
- How to log in or download it
- What to do first
- Where to get help
A strong onboarding system does not overwhelm customers with every lesson, bonus, upgrade, and promotional offer at once.
It gives the customer the right information in the order it is needed.
The simplest onboarding process has six stages:
- Purchase confirmation
- Product delivery
- Welcome message
- Quick-start instructions
- Follow-up support
- Progress or satisfaction check
Key Takeaways
- Test the customer experience from checkout to product access.
- Deliver the purchase before presenting additional offers.
- Give customers one clear first action.
- Use short follow-up messages to prevent common confusion.
- Keep support instructions visible and easy to understand.
Affiliate Disclosure: This article contains affiliate links. If you purchase through one of these links, I may earn a commission at no additional cost to you. Affiliate compensation does not determine the conclusions or recommendations presented in this article.
Why Onboarding Matters
A customer may purchase a useful product and still have a poor experience when the next steps are unclear.
Common onboarding problems include:
- The receipt arrives, but the access email does not.
- The product link is buried inside a promotional message.
- The customer does not know whether to download or log in.
- The password-reset process is confusing.
- Several bonuses appear without instructions.
- The first course module assumes prior knowledge.
- Support information is difficult to find.
- The customer receives an upgrade offer before receiving the purchase.
These problems can create unnecessary refunds and support requests.
A clear onboarding system protects the value of the product by helping the customer use it.
Step 1: Map the Customer Journey
Write down every step from the customer’s perspective.
Do not begin with your software.
Begin with what the buyer sees and does.
A simple journey might be:
- Customer reads the sales page.
- Customer clicks the purchase button.
- Customer completes payment.
- Customer sees a confirmation page.
- Customer receives a receipt.
- Customer receives product-access instructions.
- Customer logs in or downloads the files.
- Customer receives a welcome message.
- Customer completes the first action.
- Customer contacts support when needed.
Walk through the journey using a separate test email address.
Record every point where the process feels uncertain.
Step 2: Create a Clear Confirmation Page
The confirmation or thank-you page should answer immediate questions.
Include:
- Confirmation that the order was received
- Product name
- Delivery method
- Email address where instructions were sent
- Expected next step
- Support contact
- Reminder to check spam or promotions folders
Example:
Your order for the Beginner Digital Product Planning Guide has been received. Access instructions are being sent to the email address used during checkout. Please allow several minutes and check your spam or promotions folder when the message does not appear.
Do not make the customer search through a long sales page to locate this information.
Step 3: Separate the Receipt From the Access Instructions
A payment receipt confirms the transaction.
An access email explains how to receive the product.
These messages may come from different systems.
The customer should understand the purpose of each one.
Receipt Email
Include:
- Order number
- Product name
- Amount charged
- Payment method summary
- Billing support information
Access Email
Include:
- Product name
- Login or download link
- Username information
- Password instructions
- First action
- Product-support contact
Do not assume the receipt will provide enough information to use the product.
Step 4: Make the Product Easy to Identify
Use consistent naming across:
- Sales page
- Checkout
- Receipt
- Access email
- Customer dashboard
- Download file
- Course area
- Support page
If the sales page calls the offer “The Beginner Content Planning System,” the delivery area should not call it “BCPS Package 01.”
Internal names create confusion.
Step 5: Deliver the Product Reliably
Delivery depends on the product format.
Downloadable Guide
Provide:
- Download link
- File type
- File size when helpful
- Instructions for saving the file
- Support contact
Online Course
Provide:
- Login page
- Username or email instructions
- Password process
- Course location
- First module
- Support contact
Membership
Provide:
- Login instructions
- Membership schedule
- Content location
- Billing information
- Cancellation process
- Community rules
Software
Provide:
- Download or login link
- License key
- Installation instructions
- System requirements
- Support documentation
ProductDyno currently describes tools for delivering digital downloads, online courses, and memberships, including access management and protected content. Its public pages also describe course and membership management options.
You can review ProductDyno’s digital-product delivery options.
Choose a delivery platform based on the product you actually sell. A single PDF may not require the same system as a course containing videos, quizzes, discussions, and progress tracking.
Step 6: Create a Short Welcome Email
The welcome email should help the customer begin.
Use this structure:
Subject: Your first step inside [PRODUCT NAME]
Opening:
Welcome the customer and confirm the product.
Access reminder:
Provide the login or download link again.
First action:
Tell the customer exactly where to begin.
Time expectation:
Explain whether the first step takes five minutes, one lesson, or another realistic amount.
Support:
Provide the help address or support page.
Do not place several promotions before the first action.
Step 7: Provide a Quick-Start Checklist
A quick-start checklist may contain three to seven steps.
For an ebook-planning workbook:
- Download the workbook.
- Read the two-page introduction.
- Complete the reader-profile worksheet.
- Choose one problem for the ebook.
- Save the completed worksheet.
- Continue to the outline section.
For a course:
- Log in.
- Watch the welcome lesson.
- Download the workbook.
- Complete Lesson 1.
- Record questions.
- Use the support page when needed.
The checklist reduces uncertainty.
Step 8: Build a Short Onboarding Email Sequence
A complete sequence may contain three to five messages.
Email 1: Access and Welcome
Send immediately.
Confirm access and provide the first step.
Email 2: Prevent a Common Mistake
Send after the customer has had time to begin.
Explain one obstacle.
Email 3: Highlight an Important Resource
Show where to find the workbook, checklist, FAQ, or support page.
Email 4: Encourage Implementation
Remind the customer to complete one useful action.
Email 5: Request Feedback
Ask whether the product was accessible and what question remains.
GetResponse supports autoresponders that can send messages automatically after subscription or at scheduled points in a sequence. Its current help documentation explains that an autoresponder can send an immediate message after a person joins through a landing page.
You can explore GetResponse’s email-marketing and autoresponder features.
When the customer is added through a purchase integration, confirm that the correct list, tag, and sequence are triggered.
Step 9: Do Not Overload the Customer
A customer who purchased one guide may receive:
- Receipt
- Access email
- Welcome email
- Bonus email
- Upgrade email
- Affiliate recommendation
- Newsletter
- Community invitation
Too many messages in the first hour can create confusion.
Decide which messages are essential.
The customer’s immediate priorities are:
- Confirm the payment.
- Receive the product.
- Understand the first step.
- Know where to get help.
Promotional communication should not interfere with delivery.
Step 10: Create an FAQ Page
Include answers about:
- Missing access emails
- Password resets
- Downloads
- File formats
- Mobile access
- Course progress
- Licenses
- Refunds
- Support
Link to the FAQ from the access email and customer area.
Do not use the FAQ to hide important purchase terms that should have appeared before checkout.
A Practical Beginner Example
Imagine a customer purchases a $27 ebook and workbook package.
A poor onboarding experience might send the buyer to a page containing eight unrelated offers. The download link appears near the bottom, and the email uses an internal file name.
A better system would provide:
Confirmation Page
Your order was successful. Check your email for the download link.
Delivery Email
Download the Digital Guide Planning Workbook.
Quick-Start Step
Begin by completing the one-page audience worksheet.
Follow-Up Email
Here is how to avoid choosing a topic that is too broad.
Support Link
Contact support when the file does not open or the download is missing.
The product did not change, but the customer experience improved.
Step 11: Test Every Path
Test:
- Successful payment
- Declined payment
- Missing email
- Password reset
- Download link
- Mobile access
- Course login
- Customer dashboard
- Support form
- Refund request
- Cancellation process when applicable
Use a test purchase or low-priced test product when possible.
Do not rely only on an administrator view. Customers may see something different.
Step 12: Measure Onboarding Problems
Record:
- Missing-access requests
- Password-reset requests
- Refund reasons
- Unopened welcome emails
- Incomplete course starts
- Frequently asked questions
- Broken-link reports
- Customer feedback
When several customers ask the same question, update the onboarding system.
Do not continue answering the same problem manually when the delivery instructions can be improved.
Common Customer-Onboarding Mistakes
Sending Promotions Before Delivery
The purchase should be easy to find.
Providing Too Many First Steps
Choose one.
Using Different Product Names
Keep naming consistent.
Hiding Support Information
Make it visible.
Assuming Automation Works
Test every trigger.
Making Refund or Renewal Terms Difficult to Find
Communicate important terms clearly.
Forgetting Mobile Customers
Open messages, pages, and files on a mobile device.
Customer-Onboarding Checklist
Before Purchase
- Product contents are clear.
- Delivery method is explained.
- License and refund terms are available.
- Recurring billing is disclosed when applicable.
Immediately After Purchase
- Confirmation page works.
- Receipt arrives.
- Access email arrives.
- Product link works.
First Use
- Welcome message is clear.
- First step is identified.
- Quick-start resource is available.
- Support contact is visible.
Follow-Up
- Common mistake is addressed.
- Important resource is highlighted.
- Feedback is requested.
- Repeated questions are recorded.
Conclusion
A digital product customer onboarding system should move the buyer smoothly from payment to access, understanding, and action.
Confirm the purchase, deliver the product clearly, provide one first step, send a short support sequence, and test the journey as a customer.
Complete a test purchase of your own product and record every moment where a new buyer might become confused.