Your first digital-product launch does not need a webinar, twenty-email campaign, dozens of affiliates, paid advertising, multiple upsells, and a sophisticated automation system.
You need a product that solves a defined problem and a reliable path that allows the right person to:
Understand the offer → purchase it → receive it → use it → get support.
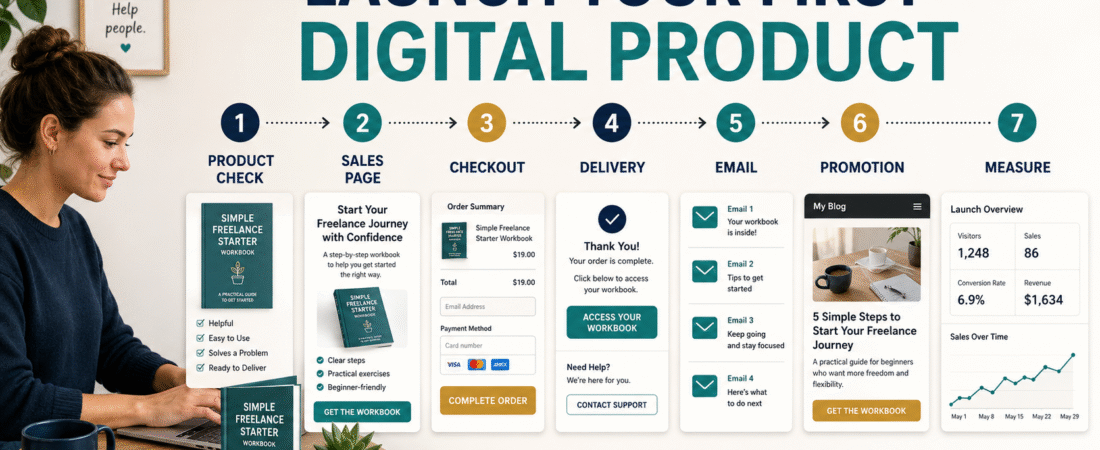
A beginner launch can therefore be built around seven jobs:
- Final product check.
- Sales page.
- Checkout.
- Delivery.
- Email.
- Promotion.
- Measurement.
Get those seven jobs working before adding complexity.
Key Takeaways
- Finish and test the product before promoting it.
- Use one clear sales page.
- Test checkout yourself.
- Make delivery immediate and understandable.
- Prepare a short email sequence.
- Promote through channels you already use.
- Track purchases, refunds, questions, and technical problems.
- Improve the system after real customers use it.
Step 1: Complete the Product
Do not launch because the calendar says you should.
Open the final product.
Review:
- Title.
- Files.
- Spelling.
- Formatting.
- Links.
- Instructions.
- Worksheets.
- Examples.
- Product promise.
Ask:
Does the product actually help the customer accomplish what the sales page will promise?
If no, fix the product first.
Create a Product Quality-Control Checklist
For an ebook:
- Final PDF exported.
- Cover correct.
- Page numbers correct.
- Links tested.
- Worksheets readable.
- Table of contents works where applicable.
- Old draft files removed.
For a course:
- Modules uploaded.
- Lessons ordered.
- Videos play.
- Downloads work.
- Student account tested.
- Support information visible.
Do not let your first customer become your technical tester.
Step 2: Write One Sales Page
A first product does not require a giant website.
The sales page should answer:
What is it?
Name and format.
Who is it for?
Specific buyer.
What problem does it solve?
The reason the product exists.
What result does it help produce?
Be realistic.
What is included?
List the actual components.
What does it cost?
Make price visible.
How is it delivered?
Explain access.
Is there a refund policy?
State the current terms.
Where does the buyer click?
Use one obvious purchase action.
Write a Direct Headline
Weak:
Transform Your Life With This Revolutionary System
Stronger:
Plan Your First Digital Product With a Step-by-Step Beginner Workbook
The second tells the visitor:
- What it is.
- Who it is for.
- What it helps accomplish.
Clarity is more useful than drama.
Step 3: Set Up Checkout
Your checkout must correctly handle:
- Product price.
- Payment.
- Buyer email.
- Confirmation.
- Taxes where applicable.
- Affiliate tracking if used.
- Refund process.
Test it.
If possible, complete a real or test-mode transaction according to your checkout platform’s procedures.
Check:
- Is price correct?
- Is product name correct?
- Does confirmation appear?
- Does the buyer receive access?
- Does the email arrive?
Keep the First Offer Simple
Avoid building:
- Order bump.
- Three upsells.
- Two downsells.
- Subscription.
- Bonus funnel.
until the core product works.
You can always add improvements later.
A clean first transaction gives you fewer things to troubleshoot.
Step 4: Set Up Delivery
Affiliate Disclosure: This article contains affiliate links. If you purchase through one of these links, I may earn a commission at no additional cost to you. Affiliate compensation does not determine the conclusions or recommendations presented in this article.
Digital-product delivery should answer:
- Where is my purchase?
- How do I access it?
- Which file should I open first?
- How do I get help?
You can review ProductDyno’s current digital-product delivery options if you need a platform designed to organize downloads, courses, memberships, and customer access.
Verify current pricing and plan requirements before purchasing any delivery software.
Create a Start-Here Page
Your customer portal should begin with:
Welcome
Then:
- Download the main product.
- Open the workbook.
- Watch the first lesson if applicable.
- Save the support email.
- Begin Step 1.
This is much easier than presenting fifteen unexplained files.
Step 5: Prepare the Email Follow-Up
A first launch can use a short sequence.
Email 1: Product Announcement
Explain:
- What it is.
- Who it is for.
- Problem it solves.
- Link.
Email 2: Teaching Email
Explain one problem connected to the product.
Email 3: Example
Show how the product could be used.
Email 4: Common Question
Address a legitimate objection.
Email 5: Reminder
Summarize the offer.
Do not pretend the offer disappears at midnight unless it truly does.
Use Your Existing Email Platform
If you already have an email platform, use it.
Do not move your entire list because another launch tutorial uses different software.
A simple launch benefits from fewer migrations.
If you are still choosing an email platform, you can review GetResponse’s current email and automation options.
Select a plan based on your actual list size and automation requirements.
Step 6: Choose Your Promotional Channels
Start with channels you already control.
Possible choices:
- Email list.
- Blog.
- YouTube.
- Facebook.
- LinkedIn.
- Pinterest.
- Existing customers.
- Affiliate partners.
You do not need all of them.
Choose two or three.
Use Your Blog
Create content connected with the product problem.
If the product teaches ebook creation:
Possible articles:
- How to choose an ebook topic.
- How to validate a product idea.
- Ebook vs. online course.
- How to create an ebook outline.
The product becomes the logical next step for readers who want the complete process.
Use YouTube
Create videos answering individual questions.
The video should provide useful information independently.
Then explain that the complete product is available through the description when relevant.
Do not turn every video into an advertisement.
Use Email
Your email list already contains people who gave you permission to communicate with them.
Explain:
- Why you created the product.
- What problem it addresses.
- Who should ignore it.
- What it contains.
Balanced positioning can build trust.
Consider a Small Founding-Customer Launch
A first version can be offered to a small group.
Benefits include learning:
- Which instructions are unclear.
- Which files are useful.
- Which questions arise.
- Whether delivery works.
- Whether the price makes sense.
Do not invent fake beta testers.
Invite real customers or subscribers.
Do Not Launch to Everyone at Once If You Are Unsure
You can begin with:
- Existing subscribers.
- Small audience segment.
- Previous customers.
Fix technical problems.
Then expand.
This is particularly useful when you are learning a new checkout or delivery platform.
Create a Launch Calendar
Day 1: Final Product Check
Review files and access.
Day 2: Sales Page
Complete and proofread.
Day 3: Checkout and Delivery
Test entire purchase process.
Day 4: Email Preparation
Load sequence.
Day 5: Promotional Content
Prepare blog and social messages.
Day 6: Private Test
Ask a trusted person to complete the process.
Day 7: Launch
Send the first announcement.
The launch could be longer.
The important point is that every day has a job.
Measure the Launch
Track:
- Sales-page visitors.
- Checkout starts.
- Completed purchases.
- Refunds.
- Customer questions.
- Broken links.
- Delivery failures.
- Email clicks.
- Affiliate activity if applicable.
Do not judge the product only by total sales.
Suppose you have:
20 sales.
But:
10 customers cannot access the product.
You have a serious delivery problem.
Keep a Launch Issue Log
Record:
Issue: Customer could not find workbook.
Fix: Moved workbook link to Start Here page.
Issue: Email link broken.
Fix: Corrected automation.
Issue: Buyers confused about product audience.
Fix: Updated sales-page section.
This turns your first launch into a better evergreen system.
Do Not Panic Over a Slow Launch
A small audience may produce a small number of sales.
That does not immediately prove:
- Product is bad.
- Price is wrong.
- Market does not exist.
Look at:
- How many qualified people saw the offer?
- Did they understand it?
- Did anyone click?
- Did anyone begin checkout?
- What questions did they ask?
Diagnose the funnel.
Ask Customers What They Needed
After purchase, ask:
- What made you purchase?
- What were you trying to solve?
- What almost stopped you?
- What part was easiest?
- What was confusing?
These answers can improve:
- Product.
- Sales page.
- Emails.
- Future content.
Turn the Launch Into an Evergreen System
After the launch period:
- Keep the sales page online.
- Add product links to relevant articles.
- Add an appropriate welcome-sequence offer.
- Continue publishing educational content.
- Review results monthly.
Now the launch becomes an ongoing sales system.
Common Beginner Launch Mistakes
Creating too many pages
One good sales page is enough to start.
Building upsells first
Get the main purchase working.
Launching before testing delivery
Test as a customer.
Adding fake urgency
Use genuine deadlines only.
Changing the product daily
Collect evidence before redesigning.
Ignoring customer questions
Questions reveal weaknesses.
Buying more software during launch week
Stability is more important.
Conclusion
Launching a first digital product can remain surprisingly simple.
Finish the product. Create one clear sales page. Connect checkout. Test delivery. Prepare a short email sequence. Promote through channels you already use. Measure what happens.
You do not need to imitate a large product launch run by a company with a large team and advertising budget.
Your first goal is to build a small launch process that works from beginning to end.
Draw the seven stages—Product, Sales Page, Checkout, Delivery, Email, Promotion, and Measurement—and verify each one before sending your first launch message.