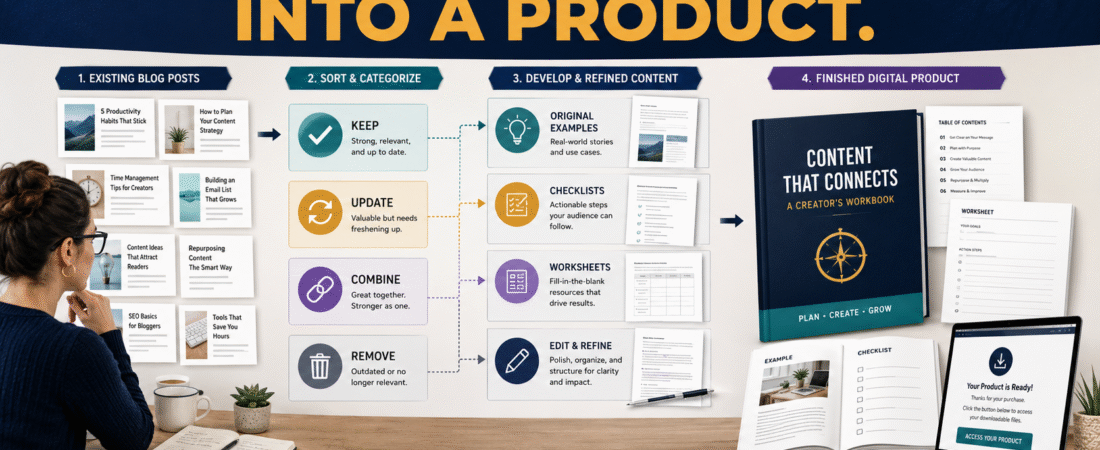
If you already have a collection of useful blog posts, you may be much closer to creating a digital product than you realize.
The best approach is not to copy ten articles into one PDF, add a cover, and start charging for it. A paid digital product should provide a more organized result than the free material. It should save the buyer time, remove unnecessary information, connect related ideas, add missing instructions, and help the customer complete something specific.
A practical process is:
Inventory your existing content → choose one customer outcome → select relevant material → reorganize it → update it → add original value → create implementation resources → edit the complete product → design and deliver it.
This allows a beginner to reuse work that has already been completed without creating a low-value collection of duplicated articles.
Key Takeaways
- Begin with the result the buyer should achieve.
- Use existing articles as source material rather than finished chapters.
- Remove information that does not support the product outcome.
- Update old examples, tools, links, and factual claims.
- Add material that was not available in the original free articles.
- Include worksheets, checklists, templates, or decision tools when useful.
- Make the product easier to follow than the original collection of blog posts.
Start With the Product Outcome
Before opening your article archive, complete this sentence:
“After using this product, the buyer should be able to…”
For example:
“After using this product, the buyer should be able to choose, validate, outline, and begin creating one manageable ebook.”
That is much stronger than:
“I am going to combine my ebook articles into a product.”
The first statement describes a customer result.
The second describes your production process.
Your buyer cares about the result.
Choose a Narrow Group of Related Articles
Suppose your website contains articles about:
- Choosing an ebook topic.
- Validating a digital-product idea.
- Writing better AI prompts.
- Creating an ebook with AI.
- Building an email list.
- Affiliate marketing.
- Google Analytics.
- Online course creation.
Do not put everything into one product.
If your product is about creating a first ebook, the most relevant source articles may be:
- Choosing the topic.
- Validating the idea.
- Planning the reader outcome.
- Creating the outline.
- Using AI responsibly.
- Editing repetitive AI writing.
- Designing the cover.
- Delivering the finished ebook.
Now you have a focused body of source material.
Create a Content Inventory
List every relevant article and label it:
Keep
The material fits the product and remains useful.
Update
The concept belongs, but the information needs revision.
Combine
Two or more articles repeat similar ideas.
Expand
The article introduces an important subject but does not teach it deeply enough for the paid product.
Remove
The material does not support the product outcome.
This process prevents the final product from feeling like a random blog archive.
Stop Thinking in Terms of Article Order
The order in which articles were originally published probably is not the best order for the buyer.
Imagine these publication dates:
March: How to Design an Ebook Cover
April: How to Validate an Ebook Idea
May: How to Outline an Ebook
June: How to Choose an Ebook Topic
A product should not preserve that sequence.
A logical product sequence might be:
- Define the reader.
- Choose the problem.
- Select the topic.
- Validate the idea.
- Define the outcome.
- Create the outline.
- Draft the chapters.
- Edit the manuscript.
- Design the product.
- Deliver it.
The product should follow the buyer’s journey.
Identify Repetition
Blog articles often repeat necessary context because each article must stand alone.
For example, three separate articles may each explain:
- What a digital product is.
- Why audience selection matters.
- Why beginners should start small.
Those repeated explanations make sense on separate web pages.
Inside one product, repetition becomes annoying.
Keep the strongest explanation once.
Then build forward.
Add a New Introduction
Do not use the introduction from one of the blog posts.
Write a product-specific introduction that explains:
- Who the product is for.
- What it will help the reader complete.
- What it will not cover.
- What tools are required.
- How the material should be used.
- Whether the reader should complete exercises along the way.
The introduction establishes a new relationship with the customer.
Create a New Chapter Structure
Turn the source material into chapters according to the customer result.
For example:
Chapter 1: Choose the Right Problem
Source material: audience and product-idea articles.
Chapter 2: Validate the Idea
Source material: product-validation article.
Chapter 3: Define the Reader Outcome
Source material: instructional-planning content.
Chapter 4: Build the Ebook Outline
Source material: AI prompting and ebook-outline content.
Chapter 5: Draft With AI Assistance
Source material: AI writing articles.
Chapter 6: Human Editing and Accuracy
Source material: AI quality-control articles.
Chapter 7: Create the Supporting Resources
New material.
Chapter 8: Design and Deliver the Product
Source plus new material.
Now the product has its own structure.
Add Material the Blog Does Not Provide
This is one of the most important steps.
A buyer should not feel that the paid product is simply material they could have opened in several browser tabs.
Add useful elements such as:
- Product-planning worksheet.
- Decision scorecard.
- Chapter template.
- AI prompt template.
- Editing checklist.
- Quality-control checklist.
- Production calendar.
- Example project.
- Resource page.
- Final implementation plan.
The extra material does not need to make the product enormous.
It needs to make the product easier to use.
Create One Connected Example
Separate blog posts often use separate examples.
A digital product can follow one example throughout the entire process.
Imagine a retired teacher who wants to create:
The First-Time Substitute Teacher Preparation Guide
Chapter 1 shows how the creator identifies the audience.
Chapter 2 validates common substitute-teacher problems.
Chapter 3 defines the product outcome.
Chapter 4 creates the outline.
Chapter 5 drafts one section.
Chapter 6 reviews it.
Chapter 7 creates the classroom checklist.
Chapter 8 packages the product.
The reader can watch one project develop from beginning to end.
That continuity creates value that disconnected articles do not provide.
Update Changing Information
Review every section for:
- Software features.
- Pricing.
- Platform terminology.
- Screenshots.
- Links.
- Legal requirements.
- Search-engine guidance.
- AI capabilities.
- Product recommendations.
- Statistics.
Do not assume an article published two years ago is still accurate because the writing sounds current.
Replace outdated information or remove it.
Rewrite Transitions
Articles originally have endings.
Chapters need transitions.
Remove sentences such as:
“Check back next week for more information.”
Replace them with:
“Now that you have narrowed the product idea, the next step is determining whether enough evidence exists to justify creating it.”
This makes the book feel intentional.
Decide What Should Remain Free
You do not need to delete the original blog posts.
The free articles can continue to:
- Attract search visitors.
- Answer individual questions.
- Introduce your teaching style.
- Lead to your email list.
- Introduce the complete product.
The paid product can offer:
- Organization.
- Depth.
- Sequence.
- Exercises.
- Convenience.
- Templates.
- Implementation.
Free and paid content can support each other.
Do Not Artificially Hold Back Important Information
Some creators intentionally make free content incomplete so the reader must buy the product.
That can weaken trust.
Your free article should answer the question it promises to answer.
The paid product earns its price through:
- Greater completeness.
- Better organization.
- Tools.
- Examples.
- Implementation guidance.
- Convenience.
You do not need to make free information bad in order to make paid information useful.
Use AI to Help With Reorganization
Affiliate Disclosure: This article contains affiliate links. If you purchase through one of these links, I may earn a commission at no additional cost to you. Affiliate compensation does not determine the conclusions or recommendations presented in this article.
AI can assist with:
- Grouping related articles.
- Identifying repeated material.
- Creating chapter structures.
- Finding missing transitions.
- Turning explanations into checklists.
- Creating worksheet drafts.
- Developing example scenarios.
- Comparing the product against the intended result.
You can review the current AI Product Engine offer if you want to evaluate a specialized platform for creating ebooks and related digital-product assets.
Do not let the software determine the final product without reviewing every section.
Use a Master Source Document
Create one document containing only the relevant material.
Label each section with its original source.
For example:
Source Article 1: Choosing an Ebook Topic
Relevant sections:
- Audience.
- Problem.
- Scope.
Source Article 2: Product Validation
Relevant sections:
- Audience questions.
- Evidence.
- Pilot testing.
This helps you track where the material came from and prevents accidental duplication.
Create the First Product Draft
Build a rough version using:
- New introduction.
- New chapter order.
- Existing useful content.
- New transitions.
- New exercises.
- New examples.
Do not spend hours designing the cover yet.
First confirm that the product works as a complete learning experience.
Conduct a Gap Review
Read the draft from beginning to end.
Ask:
- Does the reader know what to do first?
- Are any steps missing?
- Do chapters assume knowledge that was never explained?
- Is the same concept repeated?
- Are there abrupt jumps?
- Does each exercise support the outcome?
- Does the final chapter actually complete the process?
Write down the gaps.
Then fill them.
Create Implementation Resources
Useful resources can turn passive reading into action.
For an ebook-creation product, you might add:
Audience Worksheet
Helps define the reader.
Topic Scorecard
Compares several product ideas.
Validation Checklist
Identifies evidence before creation.
Chapter Planner
Defines each chapter’s purpose.
AI Prompt Template
Provides controlled instructions for drafting.
Editing Checklist
Checks repetition, accuracy, and completeness.
Publication Checklist
Verifies files and links.
These resources may become some of the most valuable parts of the product.
Design the Product Last
Once the content is complete:
- Choose fonts.
- Create chapter headings.
- Add page numbers.
- Format worksheets.
- Create the cover.
- Add brand information.
- Export the PDF.
- Test links.
You can examine ClickDesigns for creating ebook covers, workbook graphics, and product mockups when you need visual assets for the finished product.
Design should improve readability, not distract from the information.
Test the Product as a Customer
Download the final file.
Open it on:
- Desktop.
- Phone.
- Tablet if available.
Check:
- Table of contents.
- Links.
- Page breaks.
- Worksheet spacing.
- Images.
- Headings.
- Spelling.
- File size.
- Download process.
Then ask another person to follow one exercise without explanation.
If they need information that is not in the product, add it.
A Simple Blog-to-Product Workflow
Step 1: Choose one outcome
Decide what the buyer will complete.
Step 2: Identify related articles
Use only material connected to that outcome.
Step 3: Categorize the material
Keep, update, combine, expand, or remove.
Step 4: Build a new structure
Organize around the customer journey.
Step 5: Remove blog repetition
Keep one strong explanation.
Step 6: Add original product material
Create worksheets, checklists, examples, and transitions.
Step 7: Update facts
Verify changing information.
Step 8: Create the draft
Read it as one product.
Step 9: Fill gaps
Add missing instructions.
Step 10: Design and export
Create the finished files.
Step 11: Test
Review the complete customer experience.
Common Mistakes
Copying articles into one PDF
That creates a collection, not necessarily a product.
Preserving publication order
Organize according to the buyer’s journey.
Leaving repeated introductions
Blog repetition becomes product clutter.
Failing to add new value
Give the buyer organization, depth, implementation, or tools.
Using outdated articles
Verify changing information.
Designing before editing
Complete the product first.
Trying to use every old article
Remove anything that does not support the outcome.
Conclusion
Turning blog posts into a digital product can be one of the most practical ways to reuse work you have already completed.
The key is transformation rather than simple repackaging.
Choose one customer result, gather only the relevant articles, reorganize the material, remove repetition, update old information, add original examples and implementation resources, and create a new product experience.
Your existing content gives you a head start. The paid value comes from what you do with it.
Choose five related articles and sort their sections into Keep, Update, Combine, Expand, and Remove before creating your first product outline.